

Getting Started
What is MiCareerCompass, and what is the purpose of the platform?
MiCareerCompass helps individuals explore careers, build skills, and find jobs aligned to their goals. It uses AI to deliver personalized career pathways, learning opportunities, and job listings. Through MiCareerCompass, TalentFirst aims to build out the talent pipeline for in-demand industries in West Michigan exposing career seekers to careers in this industry, learning opportunities, and job opportunities.
Permissions
What types of accounts are available for staff, and what are the differences between the account types?
Staff can have either an Administrator account or a standard Staff account. Staff have the ability to monitor and support users which includes the following functions [viewing and editing user profiles, assigning roadmap steps, and tagging users]. In addition to staff permissions, Administrators are also able to manage platform configurations, manage staff accounts, and analyze data.
An Administrator has the ability to set and adjust some platform configurations, manage staff accounts, and pull data reports.
What permission levels exist for staff?
- Admin: Full access (manage staff, assign coaches, pull reports, manage catalog)
- Coach/Staff: Limited access (view and support assigned users, assign roadmap steps, tag users)
- Coaches can be limited to see users by the following:
- Those associated with their “group”, which may be those referred from their organization, who have taken their training program, etc.
- Those assigned to them as a coach
- Coaches can be limited to see users by the following:
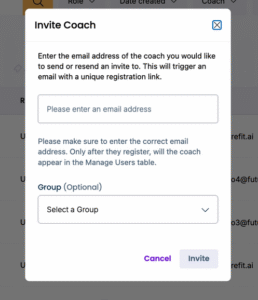
How do I add a new staff or coach account?
If you have Admin access:
- Go to the top of the Manage Users Table.
- Click “Invite Coach”
- Enter the coach’s email and, if using group permissions, select the coach’s organization from the dropdown:
What is a group and how do I create a group?
A group is a cohort of users that you want to separate for the sake of coach/staff visibility.
To create a group as an admin, follow these steps:
- Go to the “Group” section in the left-hand navigation bar.
- Click the button “+ Group”.
- Enter the name of the Group.
Please note, groups cannot be deleted at this time once created.
How do I assign a user to a group?
Users can be assigned to a group in two ways:
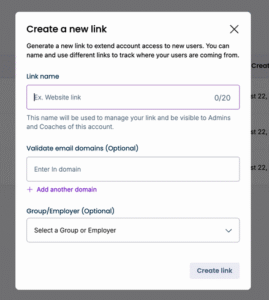
- Through a unique sign-up link:
- Go to the Manage Section of your Admin account
- Click on the Links Section at the top of the page
- Click “+ Link”
- Enter the name you want associated with the link and select the group you want associated with it. [Note: The link name cannot be the same as an existing tag name]
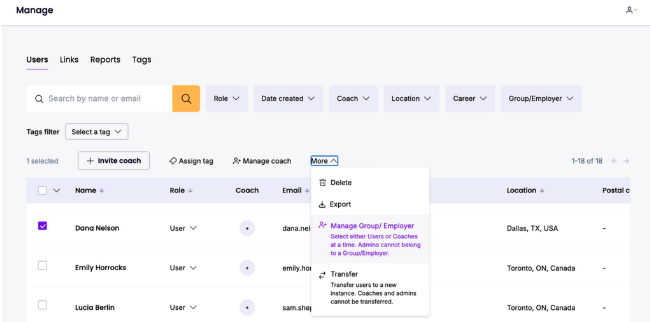
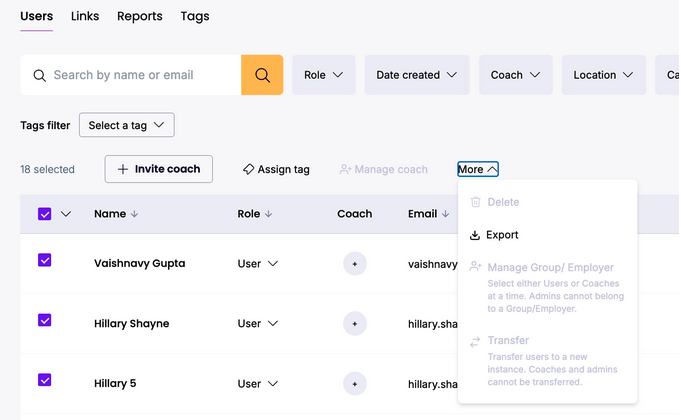
2. Manually assign a user via the Manage Users Table:
- Select the users you would like to add to a group by selecting the checkbox on the left hand side of their row in the table.
- Click the more button and select “Manage Group/Employer”
- Select the Group you’d like to assign them to from the drop down button.
Data & Insights
What is the Insights Dashboard?
The Insights Dashboard is your central hub for monitoring platform engagement. It allows you to view real-time data on:
- User Profile Data:
- Number of Users
- Experience by Career Areas & Role
- Most Common Skills Across Profiles
- Users by Tag
- Selected Career Paths
- User Engagement Data:
- Onboarding Rates
- Sessions by Device Type
- Average # of Sessions for Returning Users
- Visits, Clicks to Learn More, Clicks to Apply to Jobs
- Visits, Clicks to Learn More, Clicks to Enrol to Learning Opportunities
- Visits, Clicks to Learn More, Clicks to Select Careers
To gain access to Insights, please request it from your CSM. Please note, Insights is only available to Admin not Coach accounts.
- User Profile Data:
How do you pull a report?
Admins can pull reports by:
- Selecting the users you’d like included in the report from the manage jobs table (you can press the down arrow button at the top of the checkbox column to select all users).
- Click the more button at the top of the Manage Jobs Table.
- Select Export
- Name the Export
- Go to the Reports Section at the top of the page
- Your report will be there to download when ready [May take up to a few minutes for large reports].
What types of data are in a report?
Admins can generate reports to access the following data points:
- User name
- User contact information
- User location
- Education Experience
- Work Experience
- Tags
- Answers to form questions
Reports can be exported as a csv for internal tracking or grant reporting purposes.
Tags
What is a tag, and why use them?
Tags are labels assigned to users to help staff organize and support learners. Examples include: support needs, program affiliation, community group membership. Tags make it easier to filter reports, assign coaches, or run targeted outreach.
How do I assign or remove tags?
- To assign: Select a user (or group of users) in the Manage Users Table → click Assign Tag.
- To remove: Open a user’s profile → click the pencil icon near their name → remove the tag with the “x.”
How do I filter by tag?
Use the drop-down at the top of the Manage Users Table. Multiple tags can be combined using AND, OR, or NOT filters.

Tracking Links
What are tracking links, and how do they work?
Tracking links are unique URLs you can share with job seekers in order to associate them with a tag and/or group. When a user signs up using your tracking link, they will automatically be associated with that tracking link, making it easier to attribute engagement to your organization or program.
When should I use tracking links?
- Outreach campaigns (emails, flyers, community events)
- Partner referrals (assigning credit to referring organizations)
- Program-specific cohorts (separating learners into different groups)
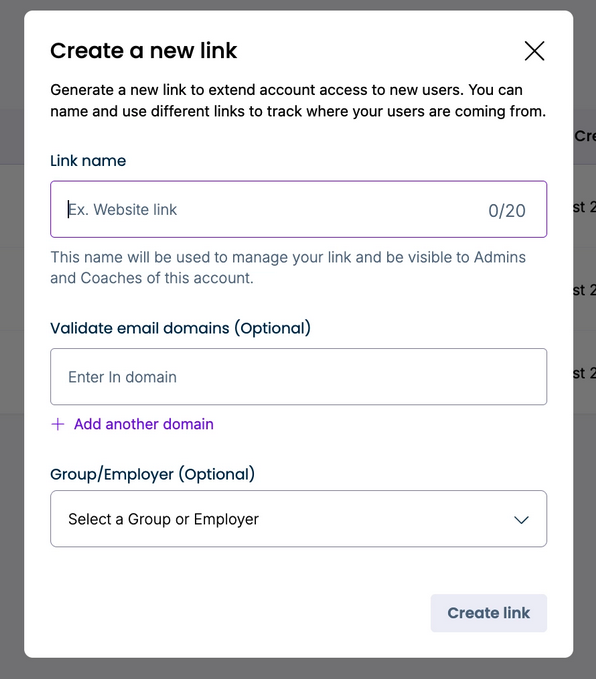
How do I create a user link?
- Go to the Manage Section of your Admin account
- Click on the Links Section at the top of the Manage Section.
- Click “+ Link”
- [If applicable] Enter the name you want associated with the link and select the group you want associated with it. [Note: The link name cannot be the same as an existing tag name]
Where do I find my tracking link?
Admins can find their tracking links and copy tracking links for specific staff, partner organizations, or campaigns through the Links Section in the Manage Section of their Admin accounts.

How can I report on tracking link usage?
Tracking link data flows into the Insights Dashboard and in exportable CSV reports, allowing you to see the number of sign-ups by campaign or partner.
Supporting Users
How do I view a user’s profile?
Go to the Manage Users Table → click a user’s name. From here, you can view the following sections:
- Overview
- Assessments
- Roadmap
- Progress
- Recommended
What is included in the Overview section of a user profile?
Here, you can view and edit information on the user. This includes:
- Name
- Tags
- Skills
- Education
- Work Experience
- Select Answers to the Onboarding Form
- Download a copy of their resume [select the document icon at the top]
What is included in the Assessments section of a user profile?
The assessment section holds space for you to enter any assessment data associated with a user. If you would like to pursue an integration with an assessment, please contact your CSM.
What is included in the Roadmap section of a user profile?
- Completion – Track if users are marking off roadmap steps as complete.
- Assigning – Create a new roadmap step for a user. This could be a pre-created roadmap step saved in your library or a custom step.
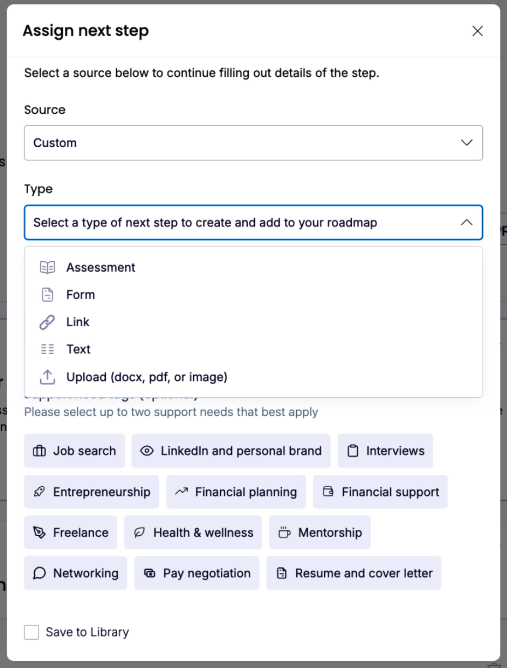
Can I assign a custom roadmap step for a user?
Yes. Click on the user’s profile → Roadmap tab → “+ Assign Next Step”. You can choose between selecting a pre-created step from your library or creating a custom roadmap step. Roadmap steps can be in the following formats:
- Assessment – Link to an existing assessment
- Form – Link to an internal form on the platform
- Link – Link to a URL (whether external or in platform)
- Text – Display an announcement or instructions to the user
- Upload (docx, pdf, or image) – Request a document from the user.
If you create a new roadmap step, you can save it to your library by checking the “Save to Library” box at the bottom of the form.
Whatever step you create, it will appear as the next step in the user’s roadmap and front and center on the homepage when the user logs back in.
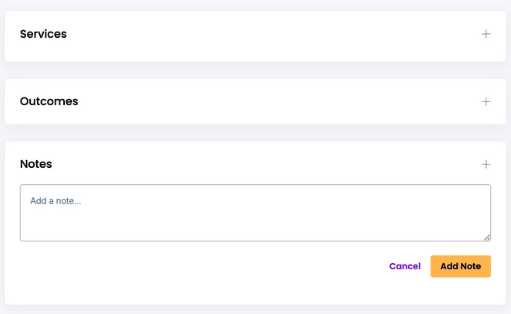
What is included in the Progress section of a user profile?
- Services – Admins and coaches can enter services provided to a given user (ex: resume review session)
- Outcomes – Admins and coaches can enter employment, education, referral, and disengagement outcomes.
- Notes – Admin and coaches can enter case notes here, which are viewable to all other staff who have permissions to view that given user.
All data entered above will be available in reports downloaded by admin.
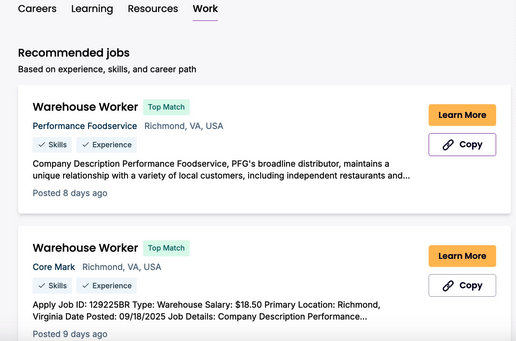
What is included in the Recommended section of a user profile?
Here you can view what recommendations are visible to a given user in their job seeker account. This includes recommended careers, learnings, resources, and jobs. For jobs, you can copy a link to the job application to share directly with the user.
How do I assign a coach to a user?
From the Manage Users Table, click the “+” sign under the coach column → choose the coach from the dropdown. They will receive an email notification.
Security & Support
What data do users have access to?
Admins can see profile-level data (skills, saved careers/jobs, roadmap steps, recommendations) and aggregate usage analytics. Passwords are not visible.
How do I reset a user’s password?
Admins cannot reset passwords. Users should click “Forgot Password” on the login screen.
How do I delete a user’s account?
Please request all account deletions directly with your CSM, who will facilitate the deletion process.
How do I update a user’s email?
The user’s email address is their username. As a result, it cannot be changed. They are welcome to create a new account with a separate email address.
How do I get technical support?
- Use the chat widget (bottom right of the platform)
- Email help@futurefit.ai
Support hours: Monday–Friday, 9am–5pm ET